Tree Widget is handy for displaying the hierarchically structured data.
There are two widgets for displaying the tree structured data.
The file directory of the UNIX is a well known example of the hierarchical structure. Here after, we'll review the program to display it.
Program tree.rb:
require 'gtk'
require 'find'

window = Gtk::Window.new(Gtk::WINDOW_TOPLEVEL)
window.border_width = 2
tree = Gtk::Tree.new
tree.set_usize 200, 200
top = ARGV.shift
dir = {}
dir[File.dirname(top)] = tree

Find.find(top) {|f|
  dirname = File.dirname(f)
  item = Gtk::TreeItem.new(File.basename f)
  item.show
  dir[dirname].append item
  if File.directory? f
    dir[f] = Gtk::Tree.new
    item.set_subtree dir[f]
  end
}

window.add tree
tree.show
window.show
Gtk.main
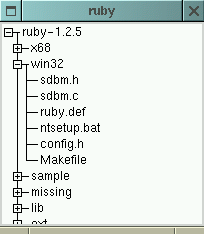
This program takes a top directory as an argument. If you specify the source directory of the distributed package of the Ruby, it will show you the result as below;
Result of excution:
(Note: Some directory is 'opened' by cliking the mouse.)
On the left of the list, there are symbol of '+' or '-'. The symbol shows wherethere the list item have a subtree beneath it. If you click the '+' symbol you can see the subtree and symbol is changed to '-'. If you click the '-' symbol you can hide the subtree and symbol turns to '+' again.
Details of the program:
require 'find'window = Gtk::Window.new(Gtk::WINDOW_TOPLEVEL)window.border_width = 2tree = Gtk::Tree.newtree.set_usize 200, 200top = ARGV.shiftdir = {}dir[File.dirname(top)] = treeFind.find(top) {|f| ... }This iterator traverses the file directory structure and will creates teh Tree and TreeItem objects.
By this 'find' method, file names are assigned to block paramater 'f' in turn. For each file name, the path is splitted into the directory name and the base file name. For each basename, program creates a TreeItem object and add to the Tree object specified by the directory name. If the file is a directory, subtree will be created. Tree object will be stored to hash with its directory name as a key.
window.add treetree.showThe user selection of the item will be caught by 'select' (Gtk) signal. If you add the latter code to the former example, the selected file name will be displayed.
Find.find(top) {|f|
  dirname = File.dirname(f)
  item = Gtk::TreeItem.new(File.basename f)
  item.signal_connect('select') {
    print f, "\n"
  }
  item.show
  dir[dirname].append item
  if File.directory? f
    dir[f] = Gtk::Tree.new
    item.set_subtree dir[f]
  end
}
Notice: the block will be excuted under the callers context.